Complete Beginner’s Guide to Growing Food in a Small Apartment
Growing food in an apartment is one of the most practical things a beginner can start today — with no garden, no balcony, and no prior experience. A sunny windowsill, a few containers, and the right choice of crops is genuinely all it takes to grow fresh herbs, salad leaves, microgreens, and even cherry tomatoes indoors.
Most people assume growing food requires outdoor space. It doesn’t. What it requires is understanding which edible plants actually thrive in an indoor growing environment — and which ones don’t. That distinction is what this guide is built around.
From setting up your first apartment container garden to your first real harvest, here is everything you need to know, in plain practical terms.
What You Can Realistically Grow in an Apartment Without a Garden
Before spending anything, it pays to know what an apartment vegetable garden can and can’t produce. The honest answer: more than most people expect — if you pick the right crops.
Grows well indoors in containers:
- Herbs — basil, mint, chives, parsley, coriander
- Salad leaves — lettuce, rocket, spinach, mustard greens
- Microgreens — radish, sunflower, pea shoots, broccoli
- Spring onions and chives
- Cherry tomatoes (with a south-facing window or LED grow light)
- Chilli peppers (warm windowsill, compact varieties)
- Radishes (fastest edible plant you can grow indoors — ready in 25 days)
Difficult without outdoor space:
- Full-size tomatoes, cucumbers, courgettes — need more root volume and outdoor pollination
- Root vegetables like carrots and beetroot — too deep for most apartment containers
- Brassicas like cabbage and kale — need cold periods and significant space to produce well
Start with the first list. Get comfortable with indoor growing. Experiment with the second only once you’ve had consistent success.
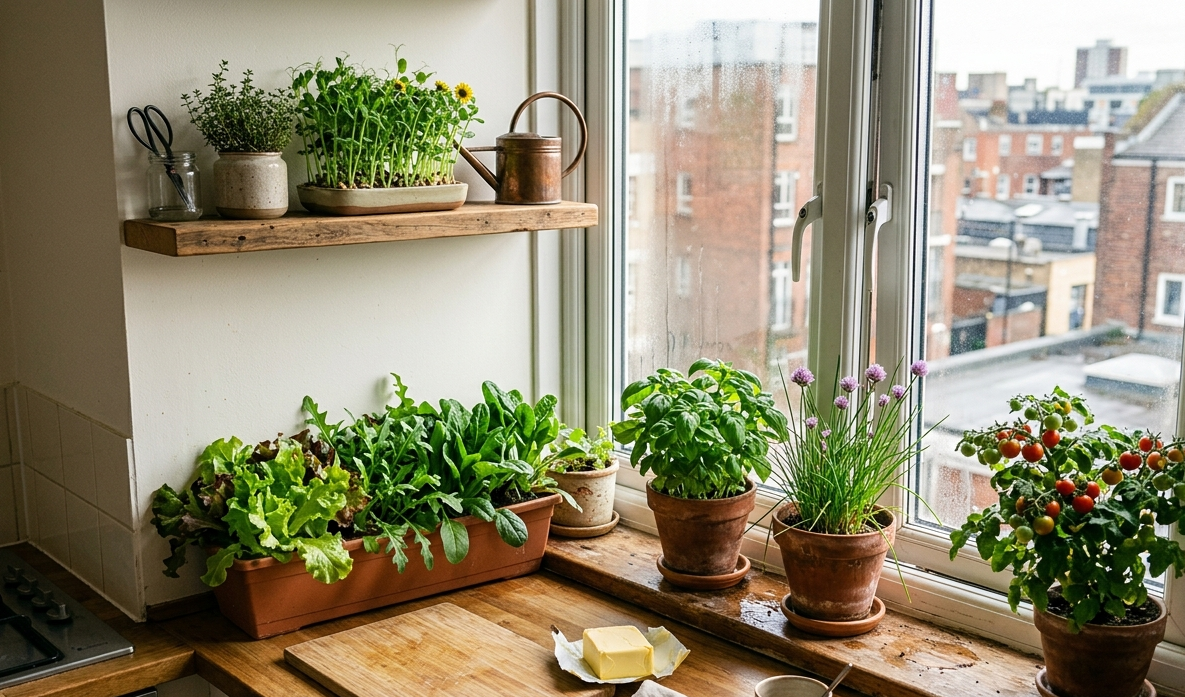
What You’ll Need to Set Up Your Indoor Food Garden
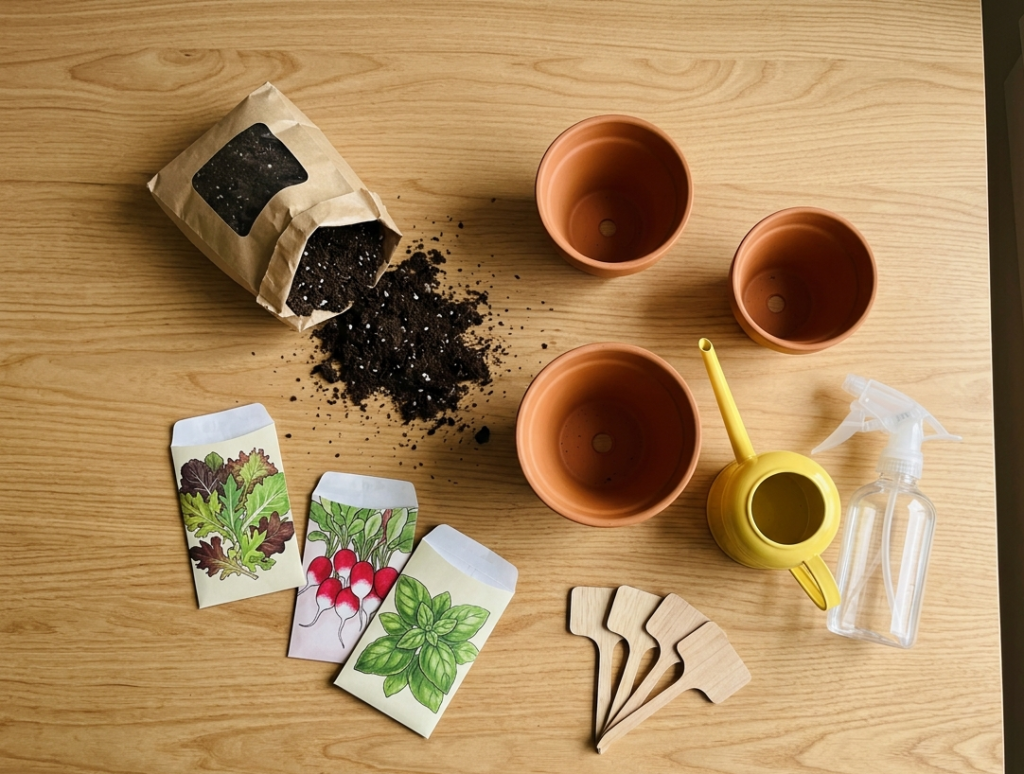
Growing food in an apartment doesn’t require specialist equipment. Here is a complete starter kit that covers every crop in this guide:
- Containers — any pot, window box, tray, or repurposed food container with drainage holes drilled in the base. Minimum 10cm deep for herbs and salad leaves; 20–30cm for tomatoes and peppers.
- Potting compost — not garden soil. Indoor potting compost drains correctly, doesn’t compact in containers, and is free of outdoor pests. This is a non-negotiable swap.
- Seeds or starter plants — seeds are cheaper and better for salad leaves and microgreens. Starter plants from a garden centre or supermarket are better for herbs, tomatoes, and peppers — they remove 4–6 weeks of germination risk.
- A watering can or spray bottle — a spray bottle is essential for misting seedlings and microgreens without disturbing the soil.
- Drip trays or saucers — one under every container to catch drainage and protect your windowsill or shelving.
- Optional: an LED grow light — if your apartment receives less than four hours of direct sunlight daily, a grow light transforms what you can grow indoors.
Estimated startup cost: £15–35 / $15–40 depending on what you already own.
Step 1: Assess Your Apartment’s Light Before Buying Anything
Light is the most critical variable in any indoor vegetable garden. Food crops need significantly more light than decorative houseplants — most edible plants require 6–8 hours per day to produce a harvest worth eating.
Check which direction your main windows face before choosing crops:
South-facing window (best for growing food indoors): 6–8+ hours of direct light daily. Suitable for the full list — tomatoes, peppers, herbs, and salad leaves all thrive here.
East-facing window (good): 4–6 hours of morning light. Ideal for herbs and salad leaves. Tomatoes and peppers will grow more slowly but are still possible.
West-facing window (acceptable): Afternoon light, slightly warmer. Works well for most herbs and leafy greens. Good secondary location for a windowsill garden.
North-facing window (limited): Fewer than 4 hours of usable light. Best for microgreens, sprouts, and mint. Supplement with a grow light for anything that needs more.
If your apartment has poor natural light: A basic LED grow light (£20–45) placed 15–20cm above your plants, running 14–16 hours per day, replicates a south-facing window almost exactly. For a small apartment container garden on a shelf, a single LED panel covers everything.
Step 2: Choose the Right Containers for Apartment Growing
Container gardening in an apartment works with almost any vessel — the type matters far less than one simple rule: every container must have drainage holes at the base.
For herbs and salad leaves: A 10–15cm pot, a window box, or a repurposed tin can with 4–5 holes drilled in the base all work equally well. Herbs and leafy greens have shallow roots — they need width and drainage, not depth.
For tomatoes and peppers: Use a container at least 20–30cm deep and wide. Fabric grow bags are the best option for apartment growers — they’re lightweight, inexpensive, and their breathable sides actively prevent root rot by allowing excess moisture to escape. A standard plastic pot works, but fabric bags consistently produce healthier root systems.
For microgreens: A shallow tray just 3–5cm deep is all you need. A baking tray with holes drilled in, a repurposed takeaway container, or a seedling tray — any of these work. Microgreens don’t develop deep roots; they’re harvested before that stage.
The golden rule for all container gardening indoors: roots sitting in standing water will rot within days. Drainage holes are not optional.
Step 3: The Five Best Crops to Grow Food Indoors as a Beginner
These five crops represent the best starting point for anyone growing vegetables in an apartment for the first time. Each one is chosen for fast results, tolerance of indoor conditions, and forgiving behaviour when mistakes happen.
Microgreens — ready to harvest in 7–14 days
Microgreens are young seedlings of edible plants harvested at the cotyledon stage — just after the first true leaves appear. They take up almost no space, grow in any light condition (including low light), and are the fastest food you can produce indoors. Radish microgreens develop full radish flavour in under ten days.
How to grow microgreens in an apartment: Fill a shallow tray 2–3cm deep with potting compost. Scatter seeds densely across the surface — much more closely than you would for mature plants. Mist gently with a spray bottle. Place on any windowsill. Harvest with scissors at soil level when seedlings reach 5–8cm.
Best beginner varieties: Radish (fastest, spicy flavour), sunflower (mild, nutty), pea shoots (sweet, tender, very fast).
Salad Leaves — ready in 21–30 days, harvests for months
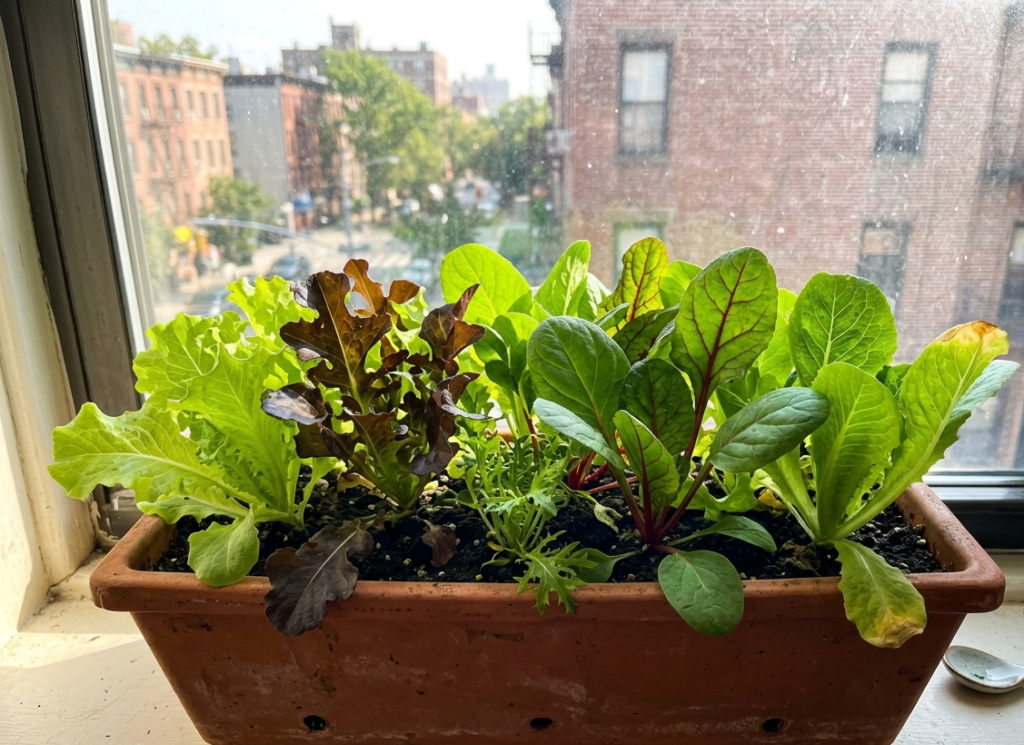
Lettuce, rocket, and spinach are cut-and-come-again crops — you cut the outer leaves and the plant continuously regrows from the centre. A single window box of mixed salad leaves can supply fresh greens for weeks without resowing. This is the most practical crop for consistent daily food production in a small apartment.
How to grow salad leaves indoors: Fill a window box or wide tray with potting compost. Scatter seeds thinly, cover lightly with a thin layer of compost, water gently. Place in a bright spot — east or south-facing windowsill is ideal. Begin harvesting outer leaves once plants reach 8–10cm. Use succession sowing — start a new tray every two weeks to maintain a continuous supply rather than one large harvest.
Best varieties for indoor growing: Mixed salad leaf blend (most beginner-friendly), rocket (fast, tolerates lower light), baby spinach (nutritious, grows well in cooler apartment temperatures).
Herbs — the most practical edible plants for an apartment
A kitchen herb garden is the highest-value food crop for any apartment. Fresh herbs are expensive to buy weekly, they grow quickly indoors, take minimal space, and produce continuously for months. Growing herbs in an apartment is the single fastest return on your container gardening investment.
Best herbs to start with: Basil (needs warmth and bright light — south window or grow light), chives (tolerates low light, extremely forgiving), mint (grows almost anywhere — keep it in its own container as it spreads aggressively).
For a full step-by-step herb growing guide, see: [How to start an indoor herb garden with no experience →]
Cherry Tomatoes — the most rewarding crop for apartment windowsills
Cherry tomatoes are the most ambitious food crop on this list — and the most rewarding when they work. They need a bright south-facing window or LED grow light, a container at least 25cm deep, and consistent watering once they start fruiting. Get those three things right and a single plant will produce more tomatoes than you expect from an indoor growing setup.
Best compact varieties for apartment container gardening: Tumbling Tom (trailing habit, ideal for pots and grow bags), Tiny Tim (dwarf plant bred specifically for container growing, stays under 30cm), Red Robin (very compact, prolific producer for its size).
Critical note for apartment growers: Indoor tomatoes have no access to bees and won’t self-pollinate without help. When flowers appear, gently shake the plant once daily or use a small dry paintbrush moved between open flowers. This replicates what bees do outdoors and is essential for fruit set.
Chilli Peppers — compact, productive, and built for warm apartments
Chilli peppers are naturally suited to the warm, consistent temperatures of an indoor growing environment. They stay compact, produce prolifically once established, and a single plant on a sunny apartment windowsill can yield 30–50 chillies across a season. They’re also perennial — kept correctly, one plant can produce for two to three years.
Best indoor varieties: Apache (very compact, extremely productive), Prairie Fire (tiny plant, masses of small hot chillies), Lemon Drop (medium heat, generous producer, excellent flavour).
Step 4: Sowing Seeds and Planting Up Your Container Garden
For seeds — microgreens and salad leaves:
- Fill container to 2cm below the rim with potting compost
- Water the compost before sowing — it should feel like a damp, wrung-out sponge, not wet
- Scatter seeds evenly across the surface at the spacing shown on the seed packet
- Cover lightly with a thin layer of compost or vermiculite
- Mist the surface gently with a spray bottle — don’t pour water directly
- Cover loosely with clear cling film or a propagator lid until germination begins
- Remove the cover as soon as seedlings emerge — usually within 3–7 days
For starter plants — herbs, tomatoes, peppers:
- Water the plant thoroughly in its nursery pot before repotting
- Fill your new container two-thirds full with fresh potting compost
- Remove the plant gently — hold the root ball, not the stem or leaves
- Place in the new container and fill in around the roots, pressing lightly to remove air pockets
- Water thoroughly until water runs freely from the drainage holes
- Do not water again until the top 2–3cm of compost feels dry to the touch
Step 5: Watering and Feeding Your Indoor Food Garden Correctly
The most consistent cause of failure in apartment growing is watering on a schedule rather than checking the soil. Food crops dry out at different rates depending on pot size, crop type, season, and how much you’re harvesting.
Watering guide by crop type:
- Salad leaves and herbs: Check soil daily — these crops dry out faster than ornamental plants because you’re removing leaf mass regularly through harvesting
- Cherry tomatoes and peppers: Water deeply every 1–2 days once fruiting begins — they become increasingly thirsty as fruit develops
- Microgreens: Mist twice daily (morning and evening) from germination to harvest — never pour water directly onto young seedlings
Feeding your apartment vegetable garden: Start applying a diluted liquid fertiliser four weeks after planting, once every two weeks through spring and summer. Once cherry tomato and pepper plants begin flowering, switch to a high-potassium tomato fertiliser — this directly supports fruit development and significantly improves yield in a container growing situation.
Step 6: How to Harvest Without Damaging Your Plants
Herbs: Cut stems just above a pair of leaves using clean scissors or a sharp knife. Never strip a plant bare. The one-third rule applies — never take more than one-third of the plant at a single harvest, and give it one week to recover before harvesting again.
Salad leaves: Always pick from the outer leaves working inward. Leave the growing centre completely intact — this is where all new leaf growth originates in cut-and-come-again crops.
Microgreens: Cut at soil level with scissors when seedlings reach 5–8cm. Microgreens are a single harvest crop — immediately sow a new tray after cutting to maintain a continuous indoor supply.
Cherry tomatoes: Pick when fully coloured and slightly soft to gentle pressure. Leaving overripe fruit on the plant redirects energy away from new fruit production — pick promptly and regularly.
Chillies: Harvest regularly throughout the season, even if you don’t need them immediately. Picking frequently signals the plant to keep producing — leaving chillies unharvested causes production to slow and eventually stop.
Common Mistakes That Fail Apartment Food Gardens
Using garden soil instead of potting compost. Garden soil compacts solidly in containers, blocks drainage entirely, and frequently introduces pests into your indoor growing space. Always use potting compost designed for container gardening.
Overcrowding containers to grow more food. More plants per pot doesn’t mean more food — it means every plant competes for the same water, nutrients, and root space. Follow seed packet spacing guidelines even when it feels wasteful.
Sowing everything at once instead of succession sowing. Planting all your salad and microgreen seeds on the same day gives you one large harvest followed by nothing for weeks. Succession sowing — starting a new tray every 10–14 days — gives you a continuous, manageable harvest throughout the season.
Skipping hand pollination for tomatoes. Without bees, indoor tomato flowers will not set fruit regardless of how healthy the plant looks. Daily shaking or brush pollination is essential for any apartment tomato grower.
Abandoning the project after one failed crop. Indoor growing conditions vary significantly between seasons. A crop that fails in a cold February apartment may thrive in the same spot in June. The variables — temperature, light duration, humidity — all change, and so does what grows well. Failure once is data, not a verdict.
Frequently Asked Questions
Can I grow vegetables in an apartment with no balcony? Yes. Growing food in an apartment without a balcony is entirely achievable on an indoor windowsill or under a grow light. Microgreens, salad leaves, herbs, and cherry tomatoes all produce reliable harvests indoors with no outdoor access at all.
How much food can an apartment vegetable garden realistically produce? A 60cm window box of salad leaves provides one to two fresh salads per week consistently. A microgreens tray yields one generous harvest every 10–14 days. Two cherry tomato plants in a south-facing apartment window can supplement meals several times a week through summer. It won’t replace a weekly supermarket shop — but it meaningfully reduces it, and the freshness of home-grown produce is noticeably different.
What is the fastest edible plant to grow indoors? Microgreens are the fastest food you can grow in an apartment — some radish varieties are ready to harvest in just seven days from sowing. Pea shoots take 10–12 days. Both require minimal light and almost no equipment.
Do I need to replace the potting compost after every crop? For microgreens, yes — the compost is effectively spent after one dense sowing. For herbs and vegetables in containers, refresh the top 3–4cm of compost each spring and add a slow-release fertiliser granule at the same time. Full compost replacement is only needed every 2–3 years for perennial plants like chillies.
Is growing food in a small apartment expensive to set up? The initial setup costs £20–40 for a basic apartment container garden. Ongoing costs are low — seeds are inexpensive, potting compost lasts multiple seasons, and the food you produce quickly offsets the investment. Herbs offer the best immediate return: a single basil plant costs less than a supermarket bunch and produces continuously for months rather than days.
What’s the difference between potting compost and potting mix? They’re the same thing — the terms are used interchangeably. Both refer to a lightweight, free-draining growing medium designed specifically for container gardening. Either term on a bag label at a garden centre is what you want. Avoid anything labelled “topsoil” or “garden compost” for indoor growing.