How to Start an Indoor Herb Garden With No Experience (Complete Beginner’s Guide)
A year ago I killed three basil plants in a row. I didn’t understand why — I was watering them, I had them on a windowsill, I was doing everything the internet said. It turned out I was doing one small thing wrong that nobody mentioned. This guide covers exactly that kind of thing: the stuff beginners don’t know they don’t know.

If you’ve ever wanted fresh herbs at home but assumed you need a garden, outdoor space, or some kind of green thumb — you don’t. An indoor herb garden can live on a kitchen windowsill, a balcony ledge, or even a small shelf under a lamp. And you can start it today for less than $15.
This guide walks you through everything from scratch: which herbs to pick, what containers to use, how to water correctly, and why most beginners fail in the first two weeks (and how to avoid it)
What You’ll Need Before You Start
You don’t need to buy everything at once. Here’s a simple list to get started:
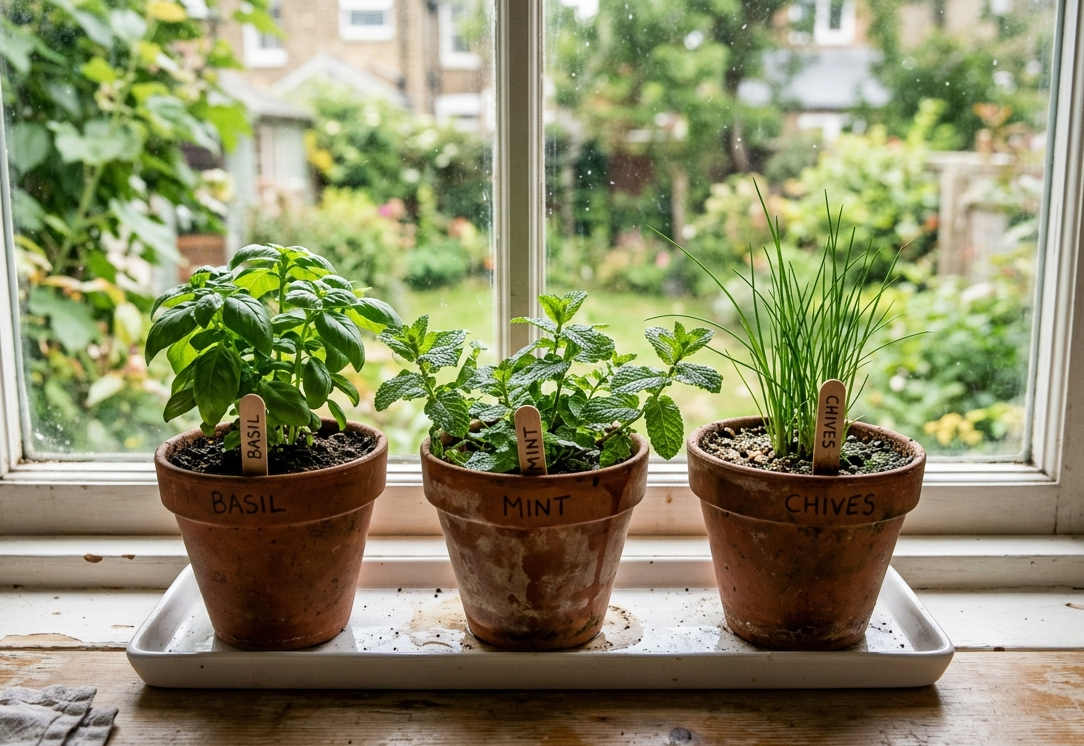
- 3 small pots (10–15 cm / 4–6 inch diameter, with drainage holes)
- Potting mix — not garden soil. Regular garden soil compacts too much indoors.
- 3 starter herb plants (not seeds — more on this below)
- A tray or saucer to sit the pots on
- A watering can or a cup with a narrow spout
That’s genuinely it. No grow lights needed to start. No fertilizer in the first month. No special tools.
Total cost estimate: $10–20 depending on your local nursery or garden centre.
Step 1: Choose the Right Herbs for Indoors
The biggest beginner mistake is picking the wrong herbs. Not all herbs are equal indoors. Some need full sun, outdoor airflow, or cold winters to thrive — none of which you can provide on a kitchen shelf.
Start with these three — they’re the most forgiving:
Basil
Basil loves warmth and bright light. It grows fast (you’ll see new leaves in days), which makes it satisfying for beginners. The catch: it hates cold drafts and overwatering. Keep it away from air conditioning vents and cold windows.
Mint
Mint is almost impossible to kill. It thrives in partial light, tolerates inconsistent watering, and spreads aggressively — which is actually a good thing in a pot because it fills out quickly and looks lush. Just keep it in its own pot; mint will crowd out everything else.
Chives
Chives are the slowest grower of the three but the most forgiving of low light. They can handle a north-facing window, tolerate neglect, and regrow after cutting. If you’re worried about forgetting to water, start with chives.
Avoid for now: Rosemary (needs very dry conditions), Cilantro/Coriander (bolts quickly indoors), Thyme (needs excellent drainage and strong sun).
Step 2: Buy Plants, Not Seeds
Seeds are cheaper, but they add 4–6 weeks of waiting and a high failure rate for beginners. You won’t know if something went wrong until it’s too late.
Starter plants — the small ones sold in pots at supermarkets or garden centres — give you an immediate result. You can harvest from them within days. Once you understand how your herbs grow and what they need in your specific space, you can experiment with seeds.
Where to find starter plants:
- Supermarkets (often very cheap, sold as “living herbs” in the fresh produce section)
- Garden centres or nurseries
- Local markets
One important note about supermarket herbs: These are usually grown in very cramped conditions under artificial light to sell quickly. They’re not meant to last. When you get them home, divide the clump into 2–3 smaller portions and repot each into its own pot. This gives each plant room to breathe and dramatically extends its life.
Step 3: Pick the Right Spot
Herbs need light. This is non-negotiable. Most herbs need 4–6 hours of direct sun per day to thrive.
Best spots, in order:
- South-facing windowsill (best — gets the most sun throughout the day)
- East-facing windowsill (good — morning sun, which herbs prefer)
- West-facing windowsill (acceptable — afternoon sun, slightly hotter)
- North-facing windowsill (difficult — only suitable for mint and chives)
If you have no good natural light: A simple grow light placed 15–20 cm above your herbs for 12–14 hours per day works well. You don’t need an expensive setup — a basic LED grow bulb screwed into a clip lamp costs under $15 and is enough for a small collection.
Avoid placing herbs near:
- Radiators or heaters (dries the soil too fast, damages leaves)
- Air conditioning vents (cold air shocks basil especially)
- Drafty gaps around windows in winter
Step 4: Plant Them Correctly
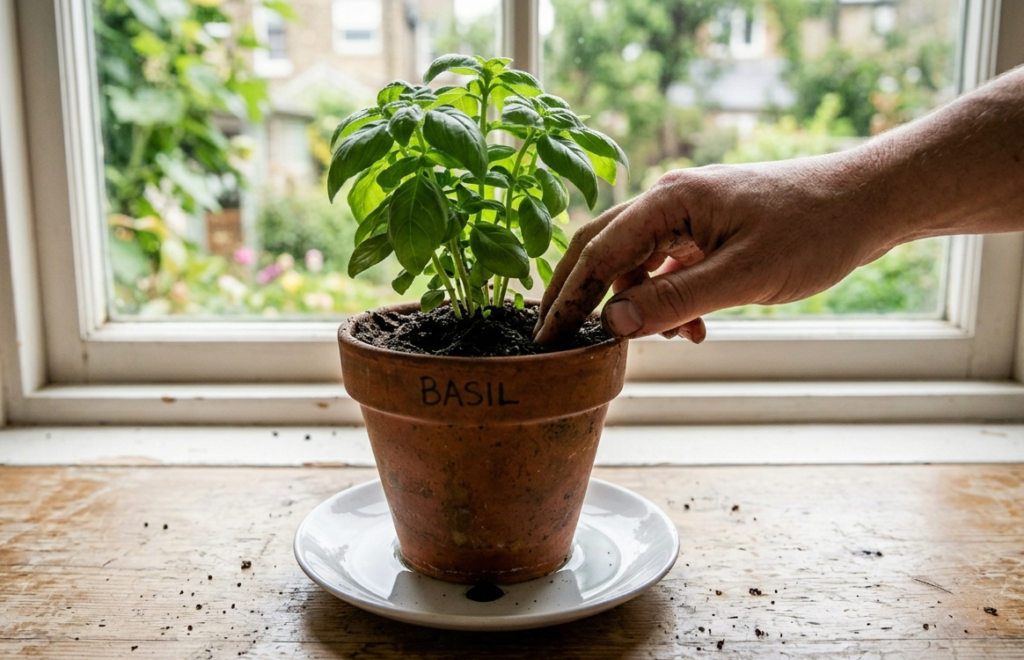
Fill your pot about two-thirds with potting mix. Place the plant in the centre, then fill in around it. The top of the root ball should sit about 2 cm below the rim of the pot — this stops water running straight off.
The most important thing: Make sure your pots have drainage holes at the bottom. Herbs sitting in waterlogged soil will rot from the roots up. If you love a pot that has no holes, use it as a decorative outer sleeve and keep the plant in a plain nursery pot inside it.
Press the soil gently around the base of the plant, then water it thoroughly — until water runs out of the drainage holes. Let it drain completely before putting the saucer underneath.
Step 5: Water Correctly (This Is Where Most Beginners Go Wrong)
Overwatering kills more indoor herbs than anything else. The symptoms of overwatering look almost identical to underwatering (drooping, yellow leaves) which is why people keep watering a dying plant and making it worse.
The correct approach:
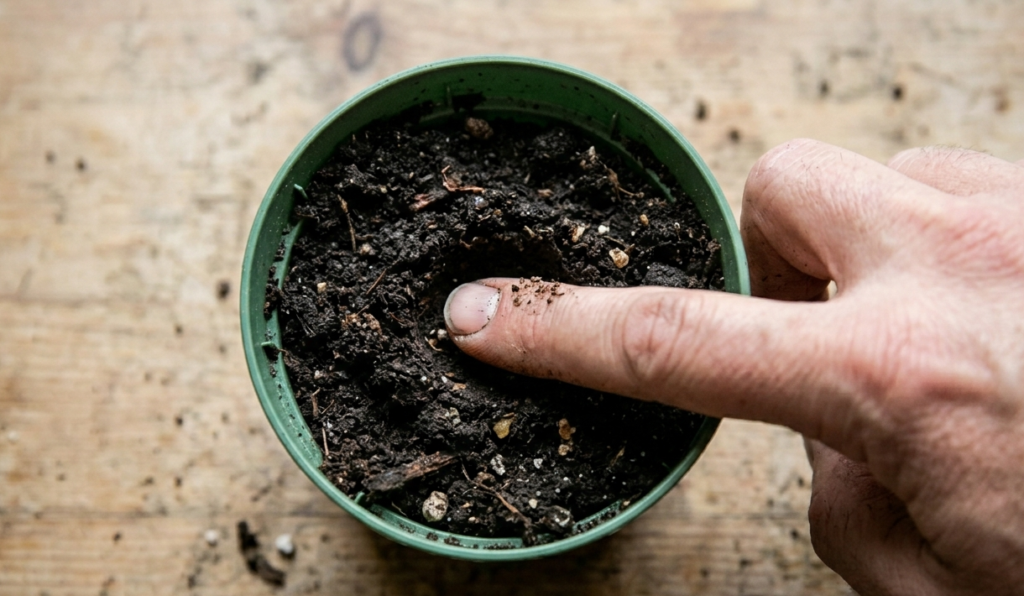
- Stick your finger 2–3 cm into the soil.
- If it feels damp, don’t water yet.
- If it feels dry, water thoroughly until it drains from the bottom.
- Empty the saucer after 30 minutes — roots should never sit in standing water.
General watering schedule as a rough guide:
- Basil: every 2–3 days in summer, every 4–5 days in winter
- Mint: every 3–4 days (slightly more tolerant of wet conditions)
- Chives: every 4–5 days (very tolerant of dry spells)
These are starting points only. Your actual schedule will depend on your pot size, soil type, and how warm and sunny your space is. Always check the soil before watering — don’t just water on a schedule.
Step 6: Harvest the Right Way
Harvesting actually encourages your herbs to grow more. But cutting them incorrectly will stunt growth or cause the plant to “bolt” (go to seed and stop producing leaves).
For basil: Always cut just above a pair of leaves, never strip bare stems. Pinch off any flower buds immediately — once basil flowers, the leaves turn bitter and growth slows dramatically.
For mint: Cut stems back by one-third at a time. The more you harvest, the bushier it gets.
For chives: Snip from the top with scissors, leaving at least 5 cm of growth at the base. They’ll regrow from the base within a week or two.
Never harvest more than one-third of the plant at once. Give it time to recover before the next harvest.
Common Mistakes to Avoid
After talking to dozens of beginner herb gardeners, these are the patterns that come up again and again:
1. Keeping supermarket herbs in their original pot. They’re usually 10 small plants crammed together in one tiny pot. Separate and repot them on the day you bring them home.
2. Watering on a fixed schedule instead of checking the soil. Monday-Wednesday-Friday watering works in summer but will rot your roots in winter when the plant is barely growing.
3. Putting herbs in a dark corner and hoping for the best. Herbs aren’t decorative houseplants. Light is their food. A dim corner will slowly starve them.
4. Letting basil flower. The moment you see flower buds, pinch them off. If you let basil flower even once, the plant shifts all its energy into seed production and the leaves become sparse and bitter.
5. Using garden soil from outside. It compacts badly in pots, drains poorly, and often carries pests. Always use indoor potting mix.
Your First Week: What to Expect
Day 1–2: Your herbs may look slightly droopy after being moved. This is normal — they’re adjusting to a new environment. Don’t water again unless the soil is completely dry.
Day 3–5: You should see the plants perk up and start standing upright again. New growth may already be visible on mint.
Day 7: If plants are in a good spot with adequate light, you’ll likely see new leaf growth. You can take a small harvest of mint or chives at this point.
If leaves are yellowing in week 1: Check if the pot is in standing water. Tip out the saucer and let the soil dry out for a few days before watering again.
Frequently Asked Questions
Can I grow herbs indoors without sunlight? Not successfully without a grow light. Herbs need light to photosynthesize. Mint and chives can manage low light, but they’ll grow slowly and become leggy. A basic LED grow light solves this completely.
How long do indoor herbs last? Basil is an annual — it lasts one growing season (6–12 months) before dying naturally. Mint and chives are perennials and can live for years if cared for properly. Chives will die back in winter and regrow in spring.
Do I need to fertilize? Not in the first month. After that, a diluted liquid fertilizer once every 2–3 weeks during the growing season (spring and summer) will help. In autumn and winter, skip fertilizing entirely — the plant isn’t actively growing and feeding it can cause more harm than good.
Can I grow herbs in the same pot together? Technically yes, but it’s not recommended for beginners. Each herb has different water and light needs, and mint especially will take over everything around it. Individual pots give you much more control.
My basil keeps wilting even though I water it. What’s wrong? This usually means one of two things: root rot from overwatering (check if the roots smell musty and the soil feels soggy) or heat stress from being too close to a south-facing window in summer. Move it slightly back from the glass and check the drainage.
What to Do Next
Once your first three herbs are established and you’ve built the habit of checking them daily, you’re ready to expand. Good next steps:
- Add a grow light if your natural light is limited — this opens up a lot more herb options
- Try growing from seed once you’ve seen what healthy seedlings look like
- Experiment with chili peppers — they grow well indoors and follow the same care principles as basil
- Start a second batch of basil from cuttings — take a stem, place it in a glass of water, and watch roots appear in 7–10 days
The biggest thing: check your plants daily. Not to do anything — just to look. You’ll learn to read them faster than any guide can teach you, and you’ll catch problems early before they become fatal.